Modelとは
Wicketでは全てのコンポーネントはModelと紐付けることができる。WicketにおけるModelとはデータを入れたり出したりできる器のようなもの。要するに、画面とロジックでの値の受け渡しはModelを経由するということ。
簡単な例
SamplePage.java
1 2 3 4 5 6 7 8 9 10 11 12 13 14 15 16 17 18 19 20 21 22 23 24 | public class SamplePage extends WebPage { private Model sampleText; private Model sampleLabel; public SamplePage() { super(); Form form = new Form("form", new Model()); add(form); sampleText = new Model(); form.add(new TextField("sampletext", sampleText)); sampleLabel = new Model(); form.add(new Label("samplelabel", sampleLabel)); Button submitButton = new Button("submit", new Model()) { @Override public void onSubmit() { sampleLabel.setObject(sampleText.getObject()); } }; form.add(submitButton); } } |
SamplePage.html
1 2 3 4 5 6 7 8 9 10 11 12 13 14 15 16 17 18 19 | <?xml version="1.0" encoding="UTF-8"?> <html xmlns="http://www.w3.org/1999/xhtml" xmlns:wicket="http://wicket.apache.org/"> <head> <meta http-equiv="Content-Type" content="text/html; charset=utf-8" /> </head> <body> <form wicket:id="form"> 前回入力値:<span wicket:id="samplelabel" /> <br /> <input type="text" wicket:id="sampletext" /> <input type="submit" wicket:id="submit" value="送信" /> </form> </body> </html> |
実際の表示
初期表示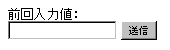
↓
編集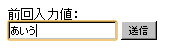
↓
送信後結果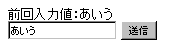
入力値は、指定したIDに紐付くModelクラスに自動で設定される。またModelクラスにJava内で値を設定することで表示値を変えることもできる。
PropertyModel
基本的には上記のModelクラスで値のやり取りはできるが、入力箇所が多くなればなるほどこの方法だと面倒になる。
- 入力項目全てについてModelを作成するのがめんどくさい
- 入力項目をひとつのBeanにまとめてしまいたい
- 複数のレコードを修正できる一覧表形式の修正画面を作りたい
上記のような場合は、PropertyModelを使うと楽になる。
簡単な例
クラスの変更点は以下。htmlは変更無し。
1 2 3 4 5 6 7 8 9 10 11 12 13 14 15 16 17 18 19 20 21 22 23 24 | public class SamplePage extends WebPage { private String sampleText; private String sampleLabel; public SamplePage() { super(); Form form = new Form("form", new Model()); add(form); form.add(new TextField("sampletext", new PropertyModel(this, "sampleText"))); form.add(new Label("samplelabel", new PropertyModel(this, "sampleLabel"))); Button submitButton = new Button("submit", new Model()) { @Override public void onSubmit() { sampleLabel = sampleText; } }; form.add(submitButton); } } |
PropertyModel(Object, String)を使用すると、Object(今回は自分自身を指定)のうちStringに該当するフィールドを探し出し、そこに対してget/setを行ってくれるので、いちいちデータ保持用のModelを作成したり操作したりせずに済む。ちなみに、上記のようにgetter/setterメソッドが無くてもフィールドが存在すれば動いてくれるらしい…が、一応getter/setterメソッドは用意したほうがいいだろう。もちろん、フィールドを用意せずにダミーのgetter/setterを作り、そのメソッド名を指定することもできる。
一覧形式で、複数レコードの修正を行う画面の例
複数件のSampleEntityを画面に一覧表示し、画面でSampleEntityデータを修正できるという感じのサンプル。
クラスは以下。
1 2 3 4 5 6 7 8 9 10 11 12 13 14 15 16 17 18 19 20 21 22 23 24 25 26 27 28 29 30 31 32 33 34 35 36 37 38 39 40 41 42 43 44 45 46 47 48 49 50 51 52 53 54 55 56 57 58 59 60 | public class SamplePage extends WebPage { private List<SampleEntity> sampleEntityList; private String sampleLabel; public SamplePage() { super(); // 表示用データを設定する(通常はDBから取得したデータなどを設定する) sampleEntityList = new ArrayList<SampleEntity>(); sampleEntityList.add(new SampleEntity("1", "sample")); sampleEntityList.add(new SampleEntity("2", "test")); sampleEntityList.add(new SampleEntity("3", "abc")); Form form = new Form("form", new Model()); add(form); // リスト表示用コンポーネント PageableListView list = new PageableListView("list", sampleEntityList, 5) { @Override protected void populateItem(ListItem item) { Object record = item.getModelObject(); item.add(new TextField("text1", new PropertyModel(record, "text1"))); item.add(new TextField("text2", new PropertyModel(record, "text2"))); } }; form.add(list); form.add( new Label("samplelabel", new PropertyModel(this, "sampleLabel"))); Button submitButton = new Button("submit", new Model()) { @Override public void onSubmit() { StringBuilder sb = new StringBuilder(); for (SampleEntity e : sampleEntityList) { sb.append(e.toString()).append(" , "); } sampleLabel = sb.toString(); } }; form.add(submitButton); } } class SampleEntity { private String text1; private String text2; public SampleEntity(String text1, String text2) { this.text1 = text1; this.text2 = text2; } @Override public String toString() { return text1 + ":" + text2; } } |
HTMLは以下。
1 2 3 4 5 6 7 8 9 10 11 12 13 14 15 16 17 18 19 20 21 22 23 24 25 26 27 28 29 30 31 32 33 | <?xml version="1.0" encoding="UTF-8"?> <html xmlns="http://www.w3.org/1999/xhtml" xmlns:wicket="http://wicket.apache.org/"> <head> <meta http-equiv="Content-Type" content="text/html; charset=utf-8" /> </head> <body> <form wicket:id="form"> 前回入力値:<span wicket:id="samplelabel" /> <input type="submit" wicket:id="submit" value="送信" /> <table border="1"> <thead> <tr> <th>text1</th> <th>text2</th> </tr> </thead> <tbody wicket:id="list"> <tr> <td><input type="text" wicket:id="text1" /></td> <td><input type="text" wicket:id="text2" /></td> </tr> </tbody> </table> </form> </body> </html> |
実際の表示
初期表示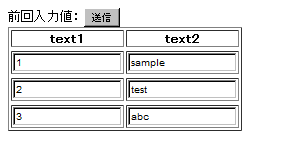
↓
編集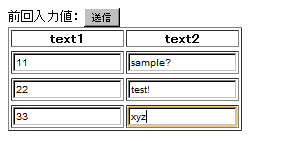
↓
送信後結果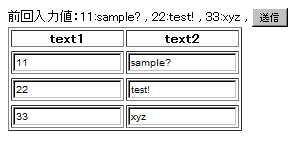
そう考えると、普通のModelクラスを使う機会はかなり少ないかもしれない。
CompoundPropertyModel
PropertyModelからさらに手抜きするためのクラスとして CompoundPropertyModel がある。
ModelやPropertyModelでは、コンポーネントをnewする度にモデルもnewしコンポーネントに追加していたが、CompoundPropertyModelを使用した場合コンポーネントにモデルを追加することすら省略できるようになる。
使い方は今までの2つとは若干異なっていて、「追加したいコンポーネントに」モデルを追加するという今までのやり方に対し、CompoundPropertyModelの場合は「追加される方のコンポーネントに」追加することになる。
具体的には、このようなクラスの中身を出力する処理をつくるとして
1 2 3 4 5 6 7 8 | class SampleEntity { public String text1; public String text2; public SampleEntity(String text1, String text2) { this.text1 = text1; this.text2 = text2; } } |
PropertyModelの場合はこのように書くところを
1 2 3 4 | SampleEntity entity = new SampleEntity("unko", "moreta"); Form form = new Form("form", new Model()); form.add(new Label("text1", new PropertyModel(entity, "text1"))); form.add(new Label("text2", new PropertyModel(entity, "text2"))); |
CompoundPropertyModelならこう書ける。
1 2 3 4 | SampleEntity entity = new SampleEntity("unko", "moreta"); Form form = new Form("form", new CompoundPropertyModel(entity)); form.add(new Label("text1")); form.add(new Label("text2")); |
こうすると、Formに追加したCompoundPropertyModelのbeanから、Labelに設定したIDと同名のプロパティを表示するようになる。ただし、コンポーネントのIDとCompoundPropertyModelのbeanのプロパティを一致させなければならないという制約もある。つまり
1 2 3 4 | SampleEntity entity = new SampleEntity("unko", "moreta"); Form form = new Form("form", new Model()); form.add(new Label("name", new PropertyModel(entity, "text1"))); form.add(new Label("comment", new PropertyModel(entity, "text2"))); |
このようにLabelのIDとbeanのプロパティ名を別にしたい場合はPropertyModelを使おう。